
Today I baked bread.
The original of the recipe is written in blue felt tip marker on a cardboard divider from a package of shredded wheat. I am not sure if the printing is my mother’s or her friend Jean’s who gave it to her. This is from the 1960s.

Vienna Bread
3 cups warm water
2 tablespoons sugar
2 tablespoons shortening or oil
1 1/2 teaspoons salt
1/2 cake household yeast or 2 packages dry yeast
8 cups flourMix all ingredients and stir in with a spoon — 4 cups of the flour — Add 3 more cups — 1 cup To put in while kneading. Let raise 15 minutes — punch down — Do this two more times. Put into pans and let raise 1 1/2 hours. Bake 45 minutes at 400 °F.
Bake on cookie sheet — Put crease in on top of loaves with butcher knife. Can use some corn meal on bottom of loaves.
Use for Hoagie Buns too.
Recipe makes 4 loaves bread or 2 loaves and 6 hoagie buns.
Note: Hoagies are the Western Pennsylvania equivalent of a submarine sandwich.
This is the version I am using now with less cryptic directions and metric measurments in parentheses. It is half the original recipe.
To a 10 to 12 cup capacity bowl (2 Liters) add 2 cups unbleached wheat flour (550 ml).
Add to the flour:
1 tablespoon granulated sugar
3/4 teaspoon kosher salt
1 teaspoon bulk dry yeast – see notes
Stir in, then make a depression in the middle.
Pour in:
1 1/2 cup hot tap water (350 ml)
1 tablespoon virgin olive oil (15 ml)
Mix using an electric hand mixer starting in the middle and gradually working in the flour mixture from the edges.
Once the flour mixture is incorporated, mix at high speed about 2 minutes.
Switch to a sturdy wooden spoon to mix in the remainder of the flour, 2 cups total divided into four portions. Mix in three 1/2 cup portions with the spoon.
Sprinkle most of the last 1/2 cup portion of the flour onto the kneading surface, dump the dough and scrapings from the bowl onto it. Knead the dough until it gets smooth and elastic.
Rub a little bit of olive oil in the bowl, doesn’t need to be cleaned.
Add the ball of dough, cover it and put it in a warm place for 15 minutes, then punch it down and form it into a ball again. Do this three times total. Each time the dough will become lighter and more elastic.
Split the dough — half for a loaf of bread and half for a pizza crust.
Shape the loaf and put it on a pan (grease with olive oil) to rise until about doubled in bulk.
Punch down the pizza half of the dough, shape it into a ball and let it rest in the bowl while assembling the topping ingredients from what I can find in the refrigerator and cupboard. The topping can include but is not limited to:
Crushed tomatoes
Condiments:
Garlic – crushed
Oregano – dry or fresh
Basil – dry or fresh
Chili pepper
Salt
Black Pepper
Sugar or honey
Olive oil
Chunky stuff:
Onion – diced
Bell pepper – green, red, yellow, orange or a mixture diced
Meats – sliced pepperoni, sauteed bulk Italian sausage or hamburger
Cheese – grated or shredded mozzarella, cheddar, parmesan
The dough is easier to roll out after it rests. I used a rolling pin to shape the dough into an oval about 1/4 inch thick. I put the dough into an oiled 15 by 10 inch sheet cake pan.
Today I felt in a veggie mood, so to about half a 15 oz can of crushed tomato I mixed dry oregano and basil, about a teaspoon full of brown sugar, a scant teaspoon of Asian chili garlic paste, salt and a grinding of black pepper.
The phone rang, so I wiped my hands and talked to my mom for about an hour.
When we finished, the dough in the pan had risen, so I patted it into shape, forming a raised edge. I got the bowl of sauce that had melded nicely and spread it on the crust. I then diced about 1/2 a medium size onion and sprinkled it on the tomato sauce. The cheese comes last. (If you want chewy cheese, sprinkle it on top right away. If you prefer gooey cheese, don’t add it until the pizza is almost baked.)
The loaf was nicely raised, so I made a cut across the top with a sharp knife. This is to keep the loaf from splitting just anywhere when it gets hot on the inside and the carbon dioxide from the fermenting yeast expands. Either a single cut about 1/4 inch deep the length of the loaf or several diagonal slashes work well.
I put the pizza and the bread loaf into a cold oven and set the temperature to 450 ° F (230 ° C). After ten minutes, I lowered the temperature to 400 ° (200 ° C). When I checked the pizza 5 minutes later, the crust was just starting to brown, so I pulled it out and added the cheese. In about 1 minutes, it was done.
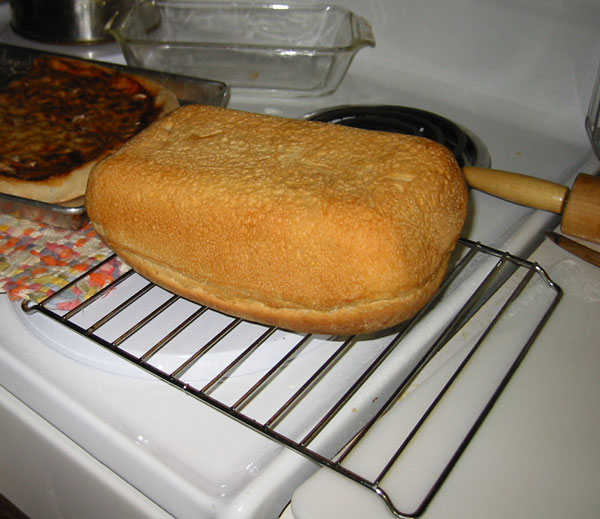
The bread was done about 15 minutes after the pizza came out, it was well browned and sounded hollow when tapped. I let it cool in the pan for a few minutes, then inverted it on a rack. It is a good idea to let the bread cool for a least 20 minutes before you try to cut it.
The chili garlic paste gave a nice tang to the sauce and balanced well with the sweetness of the brown sugar and acid from the tomatos. I had been using dry red chilis and whole garlic cloves but at $1.49 a jar from the Asia Mart, this is a great condiment to keep in the refrigerator.
General notes
I also use this dough for making meat buns. Roll bits of dough into about 4 inch wide disks. Mix equal parts ground beef and lamb and season with salt, pepper, garlic, and basil (add pine nuts if you are feeling flush). Roll into balls about the size of a walnut. Moisten the edges of the dough and pinch into a 3-cornered hat shape covering the meat ball. Place them pinched side up into a cake pan coated with olive oil and let them raise about 15 minutes. Drizzle additional olive oil over the tops and bake at 400 ° F about 20 minutes.
Raised bread is very forgiving, you can play with the proportions of the ingredients a lot more than in baking quick breads or cakes.
Many people don’t try to make bread because it seems to take such a long time. Most of the time you spend waiting for the bread to rise or to bake, so there is lots of spaces between the busy parts. Some recipes are made to be raised in the refrigerator and baked a day or two later. I find that even with my muscle and joint problems I can still make bread, it will wait when I need to rest.
If you are proficient at baking bread, invite friends over for an evening of bread making. Make sure there is entertainment (like baking a batch of cookies) while the bread raises. When the bread is done you can have a light meal of soup, salad, and wine with the fresh bread or the party members can take a warm loaf home.
Tips for the frugal
Most kinds of bread come out well when you put them in a cold oven for 10 to 15 minutes with the temperature 50 ° F higher than the recommended temperature for a pre-heated oven. If you have other dishes to bake (like a meatloaf) they can go in with the bread or if the oven is too full, put them in the oven when you have the door open to take the bread out. If you do preheat try to anticipate 10 to 15 minutes before the bread will be ready to start the oven. If you get interrupted, turn the heat off and let the oven door shut.
I usually buy 15 oz cans of tomatos (stocking up with they are on special) because I have a small household. I store the leftover tomatoes in the refrigerator and use them in the next day or two for pasta sauce. For making things like a big pot of chili or vegetable soup to freeze in portions for later use, it can be more economical to buy the larger cans of tomatoes. If you have your own garden or a local farmers market, by all means substitute fresh tomatoes when they are in season!
Over the years I have accumulated a number of “bread tools” but don’t hesitate to make bread if you don’t have everything you see on the cooking shows. Counter scrapers are handy, but you can substitute a large spatula (pancake turner). If you don’t have a sifter, use a large wire strainer.
A rack from a toaster oven can substitute for a cooling rack or set the loaf upside down and resting on the edges of the pan used to bake it.
The bread bowl I use is an inexpensive Rubbermail 12 cup covered plastic bowl that I got at a supermarket as part of a set over 20 years ago. It is light, seals well, and is easy to wash. If your bowl doesn’t have a lid, cover it with aluminum foil (fold it up and use it again), plastic wrap, or a plate.
For raising bread dough, the top of the refrigerator (paradoxically) is good because the warm air from cooling the interior often rises from the back. My other favorite place is on the bottom shelf of the cupboard over my sink. A fluorescent light fixture on the under side provides steady heat.
Buy bulk dry yeast at your local ethnic or health food store. The yeast will often be stored in a refrigerator in plastic bags. When fresh you can substitute a scant teaspoon for a package of dry yeast. Keep your dry yeast in the refrigerator in a well sealed glass jar. If you don’t bake often, store the major part of your dry yeast in the freezer keeping only a few weeks worth in the refrigerator. If you like to use cake yeast, cut the 4 oz package into chunks and freeze to keep fresh.
Unbleached flour keeps well at room temperature, so it is a good item to buy in bulk if you have room for storage, especially if you are a member of a coop. Often flour comes in paper sacks, so the main thing is to repackage it to keep insects and mice out. Metal cannisters with tight fitting lids are good for on the counter — watch for them at rummage sales. Larger metal cans, like the ones holiday treats or bulk frozen fruit come in are good. If you have a lot of space, 55 gallon drums or galvanized metal (new!) garbage cans can hold your cache of flour.
Tips for people who live with children
Be very careful when using an electric mixer, or even better, let the children take turns with a whisk or wooden spoon to mix the dough. This recipe is nice in that you punch the dough down several times. Dump it out on the counter and let them whack it.
After the last raising, give each child a chunk of dough. A lot of it will be eaten raw — no problem except maybe having to burp a bit.
Encourage them to shape the dough and add their own touches, like spreading the dough with butter, sprinkling of cinnamon sugar and rolling it up for a cinnamon bun.
Another fun thing is to wrap a hot dog with dough or to make a “pie” either with fruit or with chunks of leftover cooked vegetables, meat and cheese.
Be careful that they stay well away from the hot oven while you put their dough in to bake. If your oven door is glass, they can watch the dough rise and brown. Smaller things bake faster, so pull them out well before the big loaf is done.
The bread will be very hot when it comes out of the oven and will stay hot on the inside for quite a while. It is almost impossible to resist the temptation to eat a loaf right away though the bread will be difficult to cut. This tip is from my mom who often had a kitchen table full of cooling bread loaves when we came home from school: designate one loaf to be torn apart and eaten right away. Children will often like getting the loaf that looks sort of funny.